Sunday, March 21, 2010

Xroom


Ahoy.. I'm finally back with a new paper toy, Xroom! Actually before I got this idea, I'm doing a rhino but then I feel like its too stiff in term of overall pose and shape. Looking back to most of my previous work which doesn't have much movement to it, I feel like I wanted to do something with more kinetic design.

Xroom is a free runner that always go forward no matter what! Always confident, always progressing!


An update from Sir Gragon, he modified the arms to be attached backward. I like it!


Download me

Tuesday, February 9, 2010

Here Come The Boys!


BANZAAAAIIIIIIII!!!

The long awaited package finally arrived from the workshop! 5 Solidboys are now ready for the final touch, we still have to wait for the wood to 'settle down', I'm planning to have them coated with clear matte finishing. The previous experiment with the coating turned out to be much darker than I expected though.

Since the beginning of the first prototype, I have been receiving questions about "how many will be produced?" and "how much Solidboy will be sold?" Well, not that I'm trying to be secretive or something.. The reason I'm keeping it in silent is because I want to balance the pricing, quality and originality. After the long and intricate process now I can share you these:

- Solidboy will be limited to only 5 pieces for each pattern design.
- The price isssss..... (I hope I didn't disappoint anyone) US$200

Unlike paper toys that can be produced alot & almost instantly, working with this wood toy turned out to be very intimate. Especially with the very limited piece, they virtually kind of grows on me.. A bit sad to think that I'm going to send them away their new home too....

The picture that you see above is not the finished artwork since it's lacking the coating. I just can't hold my self to show you all the whole troop of Solidboys ;D.

Do click on the picture to get the hi-res version, it should be big enough for your desktop wallpaper.

As always, you are free to join this fun experiment by dropping any comment.. I wonder what should I try next...

======= update =======
You can see more detailed photos in my Facebook Album
5 of them are all SOLD!
======================

Friday, December 25, 2009

Merry Xmas!


Merry Xmas to all! Our friend Angelcube just did a Christmas custom from Meempee. I hope you enjoy this holiday season, can't wait for the new year countdown party too! FIESTA FIESTA FIESTA!

Download me.

Tuesday, November 24, 2009

Solidboy prototype v2.0


Ahoy everybody! Thank you for all the great comments about the 1st prototype. This is the 2nd prototype developed from the previous design. The dimension and proportions of the parts are all the same. Amendment is made for the carving, especially to the carving depth, facial and spine pattern. We also decided to slightly enlarge the 'diamond' scale texture to increase the shape consistency, resulting a very accurate repetition. I purposely took this picture with natural lighting so you can really observe the texture, no photography trick is used here.. what you see is what I see.. In a few more days we are going to show you the finished look.

Please drop your comment about this second prototype, together we can make more fun projects =D

Sunday, November 1, 2009

CXV 25


More robotic design from me! I got this shape by playing around with grids and 45degree angle line, resulting a very geometric flow. My random story that comes with this design is:

CXV is the 115th model of the Crawling Xeno Vehicle developed from the foreign technology left by the Great Flying Spaghetti Monster. Combining foreign technology with ours, human started to create many CXV customs with special purposes. By the end of the 25th century CXV become the most iconic machine which can be seen every where from battle field to agricultural field, from rock concert stage to political stage. The nano technology also make the much smaller CXV become a little helper on your kitchen table or even surgical table too...

The one that you see here a standard CXV custom for the army.

Download Me!

Tuesday, October 20, 2009

Batbot - Custom For Roomism Boxy Bat


Say hello to a custom that I made for the Roomism colaborative project. Batbot is a gargantuan flying automaton designed by mad engineer who is so obsessed with 1980s super robot cartoon, serving no purpose other than to fly around and stomp people as it landed. Be very worry if you see it flying over head...


Download Me!

Tuesday, October 13, 2009

Fatboy is now Solidboy


Battling with flu and running nose, I'm proud to inform you that Fatboy is making more and more progress now. We arrived in Jepara to meet Mr. Agung who is the sculptor for our long awaited toy. Thanks to the exciting feedbacks from all of you, we are now moving on to the design revision for the second prototype. Hopefully the good Mr. Agung can finish the prototype by end of this month as we are as curious as you are about the revised design.

Another thing is that the wooden Fatboy is now called Solidboy. This is to differentiate the paper toy with the wooden one. Who knows what the future will throw us with.. a concrete Solidboy maybe? So many things to try, so little time =)...


You might be wondering what took us so long and why do we have to trouble our self traveling here and there just to make Solidboy? Well if we tell you that because we are looking for the best sculptor, you might still wonder how good is acceptable skill for our criteria is... Well, a picture tells a thousand words. When we are looking at this wicked piece down here, we know very well that we've found the right place to make Solidboy.

Sunday, October 11, 2009

Varna Lynx


At long last, after a very long stare on the wall.. I finally finished with Lynx's skin! I have to admit that so far Lynx is the hardest to skinned, I just can't find the right skin to apply...

This version of Lynx is called Varna (वर्ण), a Sanskrit word for 'color' or 'to enclose'. Varna is a boxer fighter who is having too much things going on in his mind. After enduring years of self conflicts, his skin turned into different colors, each representing different thoughts. The grin that once revealed every time he knocked his opponent down have now become a permanent memento on his troubled face.

Click here
to see the finished Varna paper toy. Make sure your color cartridge is enough to print this dude, as you will need to print 8 A4 pages of this vibrant template. Before I came up with this design, actually I wanted to do a steam punk werewolf.. But til now its still remained as a sketch, hopefully it wont be very long til I turn it into paper toy as well...

++++++++++++++++++++++++++++++++++++++++++++++++++++++++++++++
UPDATE
If you switch the left-right upper arm, you will get a more relaxed arm pose!
++++++++++++++++++++++++++++++++++++++++++++++++++++++++++++++

Tomorrow I'm going to Jepara, a small town in Central Java to proceed with the wooden toy pre-production which is now called Solidboy. Expect to see more wooden beauty soon!

Download Me!

Tuesday, August 11, 2009

Fatboy Gets Hard!


Actually I'm planning to post this in a few more days as I'm still waiting for another prototype to be made, but I'm just bursting with excitement to show you all with this wooden Fatboy prototype! This wooden fellow here is almost double the size of the paper version, that is 18cm tall x 21 cm wide. 110% hand made by the Javanese craftsman from a little town called Jepara which is known for it's excellent carving skill.

The idea of this wooden Fatboy is to explore with the possibility of creating a Fusion Toy, an experimental toy which combines Urban Toy with Cultural Touch. As most modern toys are made from non environmental friendly plastic and the like, wooden Fatboy is made from eco-friendly waste wood. The traditional pattern is also applied to give a warm and human touch to it. A little something from Indonesia to the world.

I don't really know where can this Fusion Toy experiment lead, but with your input I'm sure it's going to be a fun place to go! Please let me know what you think with this, any kind of feedback is most welcome.


Friday, July 31, 2009

Speakerdog - The Cloudy Dog custom


Speakerdog Series 6 is finally here and it's loaded with 265 designs from every corner of the world! My little custom is called The Cloudy Dog, inspired by the Batik rain-cloud pattern from Java. I hope you like it along with the other 264 customs ;D.


Download Me

Lynx Development 3


So, here goes the final step before we can work on the skin design. After making sure that the 3D model is clean, I export it to Pepakura. Pepakura is a handy little program made by the japanese to help paper craft designer unwrap their 3D model. Despite the magical and smart unwrapping result, the procedure is very straight forward.

First you will be asked to determine the front side of the model. Then you will be asked if you would like Pepakura to do some adjustments, please don't ask me to explain what kind of adjustments is that, normally I just click OK/Next and hope the model is still in 1 piece...

After Pepakura finished asking me random question, I just need to click UNFOLD button and SHAZAM! On the right hand side window you will see the template of your 3D model. While this program is handy to some extend, there are always some part that you might want to tweak a little. The glue flap position, connecting sides, overall size, parts position, etc. Once you are done with it, I will export the template to EPS and work on Illustrator.

This Illustrator part is the final cleaning session before I can work on the skin design. Normally I will clean out the unnecessary folding lines and combine some shapes. To test the model, I will print a dummy model from the template that I'm working on. For Lynx, my concern is the on the head part. I need to get around with the construction design so we all can get the exact head shape with minimum confusion for the assembly.

Lucky for me the little night elf help me to get things right! Look what I got in the morning:

Gee..... I wish that little night elf really happened.

The truth is while I wanted to share the process on how to tweak the template to the very detail of it, I just can't because there are just too many things to jot down. In short: Yes I need a lot of adjustment to get the right template. But I have to admit that I'm very happy with what I got now compared to just a little sketch I made last time.

With this blank dummy, I will then stare at empty space until an inspiration came upon me. I hope I didn't have to stare too long this time...

Saturday, July 18, 2009

Black Friday - Stop Bombing Random Places Please


I don't usually write or design anything related to politic issues but this time I can't hold my emotion toward those cowards responsible for the recent Jakarta Bombing. It's unfair when our country is labelled as a dangerous country while we are actually the victim of some psycho terrorist it self. By a matter of minutes, 9 good peoples are lost, hundreds wounded, 200 millions honest and hard working Indonesians are effected by the action of 2 suicide bombers.

When will those psycho learn how to design something good rather than going suicidal and making bombs. Earn big money, get exposed and entertain people by making FIREWORKS if they are so into exploding something...

But, let me assure you all that the show is running as scheduled. Those kabloey monkeys is not going to stop any of my design! YEAH!

I'm about to release 3 new paper toys. One of them will is a speakerdog custom from bentheillustrator, it will be distributed by the end of this month. Make sure you stay tune to that as they will release 250 customs from all over the world!

Another toy that I'm going to post is a set of character from my good friend's comic Fantasy Story Comic who will be participating at the Singapore Toy, Games & Comic show.

The last toy is of course our baby Lynx who is still under development process.

See you later folks!


Show your support against terror on humanity,
download the Indonesia Unite Shield.

Sunday, June 14, 2009

Cheery'Gloo


Meet Cheery'Gloo, a great Nogloo custom from our friend Papermate. I really recommend this custom as not only it requires no glue to make but it will also give you two designs at one go. Actually I'm supposed to post this last month before I get buried with my work, accidentally leaving this post as a draft. My bad.

"Have a nice day! Or, may be, night?"

Download Me

Saturday, June 13, 2009

Lynx Development 2

Ok, now that I have the little sketch... I have 2 choices to proceed. One is to try to do it manually by trial and error just like what I did with Fatboy. Second is to use the quick (a.k.a. lazy) way, hail the 3D application!

Both manual-trial&error and 3D way have their own plus and minus.

The manual way will take you a longer time BUT the outcome will produce a design with more human feel to it. Normally if I'm going for the manual way, I will do A LOT of fail template. Take all the time in the world to seek the right shape milimeter by milimeter. Since you are going to spend a lot of time giving birth to the final design, in the end you might feel bonded with it. I spent around 5-6 months working on Fatboy, the longest of all my paper toy design. Until now, I still feel that Fatboy is my favourite. Maybe it's something like having your first pet.

This is the actual photo from my work in progress:
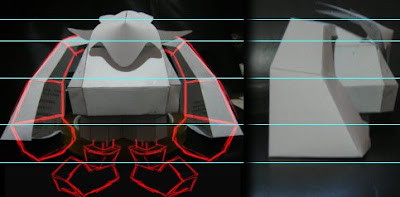
at that stage, I only have the head and body ready... struggling to find the right shape for the arm and leg. I took a photo of what I got so far, then play around with it by doing some digital scribble. It's easier to design this way since you can really see what fit and what doesn't.

"Only when the object exists can I think clearly about it".
- Marry Frank
-

Ok, now back to our soon to be born Lynx. Like I already mentioned before, this time I'm going to use the quick (a.k.a. lazy) way. This is the part where I need 3D Studio Max's brain power instead of mine... After playing (not so) cheerfully with some polygons and the beloved primitive objects, I can start to see the emerging embryo of my design:
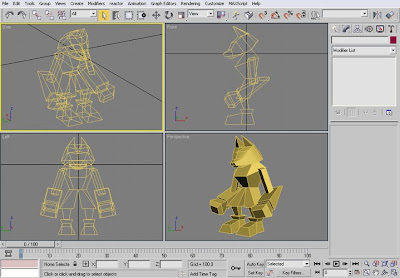

As a result this is the final 3D visualization:
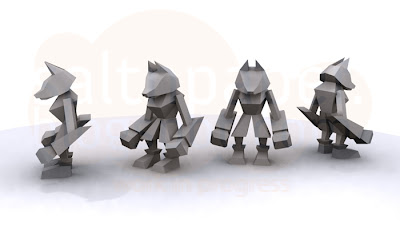

If you are not familiar with 3D application, I really encourage you to just do it manually. Be brave to make mistakes, that's where you will learn how to really make paper toy. Sketch the desired shape - draw the template - assemble the template - back to step 1 if you are not satisfied. Some people often get discouraged starting their first paper toy design, thinking they will never finish the design without the 3d application.

Well, it sure will take some time but I can bet on two of my obese pet rabbits and one ultra hyper active pet dog that YOU CAN FINISH THAT DESIGN without 3D application interference. Let us move along before I start betting on something stranger.

My point is, if you never design any paper toy before, just go easy with it... Remember to have fun as you progress. Try making something like Cubeecraft for a start!

Next I will show you another 3D application called Pepakura that will help me to 'unwrap' the above visualization and turn it into an almost ready to use template.

Wednesday, June 10, 2009

Lynx Development 1

Post by post, I'm doing more things from my to-do checklist. One of it is to post a behind the scene progress. People often ask me how to start creating paper toy, what software I used, where to find inspirations, etc... Well, I hope this post will help you know what's the best technique for you...

Frankly, I don't really have any standard operating procedure in designing paper toy, it's more kind of going with the flow... When I got an inspiration block, I often condition my self to a more conducive state of mind. I go to bookshop, observe people as they past, surf the internet, watch movie, read magazine, check out the toy shop, play some new game, anything to stimulate my right brain. Say I feel like I want to create something girly, I will read girl magazine... Or maybe when I want to create something robotic, I will try to see a lot of mecha design, play some robot game maybe...

Once I feel like I have enough stimulation, I will then 'close the book' and 'isolate' my self to start working with the design... I think it's very important for me to do this, otherwise I will keep on wasting the time with movies/games/books/etc and missed the inspiration train. On the other hand, some time ideas just popped out of no where... just like this fellow:


I designed this during my work trip out of town... As you can see, I don't use fancy sketch book (not that I against it), most of my design was born on a scrap paper. I always like to improvise and see what happen next... First thing I want to make sure is I got the character's silhouette right, the bold marker outline help me concentrate with it. Sometime it took me few days or even weeks to get the right shape. But as for this, I'm happy with what I got.

Next post I'm going to show you the 3D visualization... meanwhile, feel free to drop a comment if you want me to explain on something that I might missed.