Sunday, June 14, 2009

Cheery'Gloo


Meet Cheery'Gloo, a great Nogloo custom from our friend Papermate. I really recommend this custom as not only it requires no glue to make but it will also give you two designs at one go. Actually I'm supposed to post this last month before I get buried with my work, accidentally leaving this post as a draft. My bad.

"Have a nice day! Or, may be, night?"

Download Me

Saturday, June 13, 2009

Lynx Development 2

Ok, now that I have the little sketch... I have 2 choices to proceed. One is to try to do it manually by trial and error just like what I did with Fatboy. Second is to use the quick (a.k.a. lazy) way, hail the 3D application!

Both manual-trial&error and 3D way have their own plus and minus.

The manual way will take you a longer time BUT the outcome will produce a design with more human feel to it. Normally if I'm going for the manual way, I will do A LOT of fail template. Take all the time in the world to seek the right shape milimeter by milimeter. Since you are going to spend a lot of time giving birth to the final design, in the end you might feel bonded with it. I spent around 5-6 months working on Fatboy, the longest of all my paper toy design. Until now, I still feel that Fatboy is my favourite. Maybe it's something like having your first pet.

This is the actual photo from my work in progress:

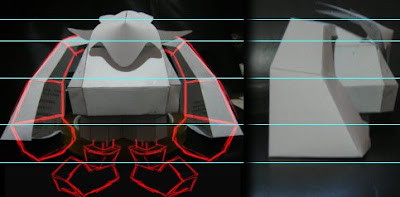
at that stage, I only have the head and body ready... struggling to find the right shape for the arm and leg. I took a photo of what I got so far, then play around with it by doing some digital scribble. It's easier to design this way since you can really see what fit and what doesn't.

"Only when the object exists can I think clearly about it".
- Marry Frank
-

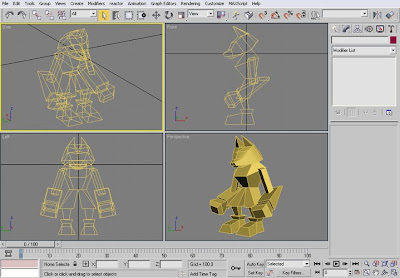
Ok, now back to our soon to be born Lynx. Like I already mentioned before, this time I'm going to use the quick (a.k.a. lazy) way. This is the part where I need 3D Studio Max's brain power instead of mine... After playing (not so) cheerfully with some polygons and the beloved primitive objects, I can start to see the emerging embryo of my design:


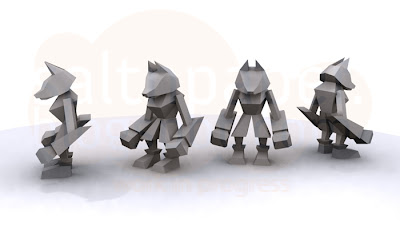
As a result this is the final 3D visualization:


If you are not familiar with 3D application, I really encourage you to just do it manually. Be brave to make mistakes, that's where you will learn how to really make paper toy. Sketch the desired shape - draw the template - assemble the template - back to step 1 if you are not satisfied. Some people often get discouraged starting their first paper toy design, thinking they will never finish the design without the 3d application.

Well, it sure will take some time but I can bet on two of my obese pet rabbits and one ultra hyper active pet dog that YOU CAN FINISH THAT DESIGN without 3D application interference. Let us move along before I start betting on something stranger.

My point is, if you never design any paper toy before, just go easy with it... Remember to have fun as you progress. Try making something like Cubeecraft for a start!

Next I will show you another 3D application called Pepakura that will help me to 'unwrap' the above visualization and turn it into an almost ready to use template.

Wednesday, June 10, 2009

Lynx Development 1

Post by post, I'm doing more things from my to-do checklist. One of it is to post a behind the scene progress. People often ask me how to start creating paper toy, what software I used, where to find inspirations, etc... Well, I hope this post will help you know what's the best technique for you...

Frankly, I don't really have any standard operating procedure in designing paper toy, it's more kind of going with the flow... When I got an inspiration block, I often condition my self to a more conducive state of mind. I go to bookshop, observe people as they past, surf the internet, watch movie, read magazine, check out the toy shop, play some new game, anything to stimulate my right brain. Say I feel like I want to create something girly, I will read girl magazine... Or maybe when I want to create something robotic, I will try to see a lot of mecha design, play some robot game maybe...

Once I feel like I have enough stimulation, I will then 'close the book' and 'isolate' my self to start working with the design... I think it's very important for me to do this, otherwise I will keep on wasting the time with movies/games/books/etc and missed the inspiration train. On the other hand, some time ideas just popped out of no where... just like this fellow:


I designed this during my work trip out of town... As you can see, I don't use fancy sketch book (not that I against it), most of my design was born on a scrap paper. I always like to improvise and see what happen next... First thing I want to make sure is I got the character's silhouette right, the bold marker outline help me concentrate with it. Sometime it took me few days or even weeks to get the right shape. But as for this, I'm happy with what I got.

Next post I'm going to show you the 3D visualization... meanwhile, feel free to drop a comment if you want me to explain on something that I might missed.

Sunday, June 7, 2009

Gammon - Abz's Custom


Yeeha! Abz from oh-sheet just sent me the new Gammon customs... As if one is not cool enough, Abz delighted us with two customs! One is the factory fresh Gammon and the other one is battle worn Gammon.

The Factory Fresh version is a brand new Gammon, strait off the robot assembly line whereas Battle Worn is torn and tattered from the many wars he's fought and is also lovingly decorated by the soldiers he's fought along side with. Awesome design Abz!


Grab your scissor and glue!

Download Factory Fresh Gammon

Download Battle Worn Gammon